Australia and New Zealand may seem similar on the surface. Both countries have stunning beaches, beautiful natural landscapes, and a laid-back attitude. We promise these destinations are not the same, although we admit their flags are very similar. Here are some key differences that you might want to consider when choosing between the lands down under.
Size
Australia is physically huge (about the same size as the United States) but the population is 24.6 million. To put that in perspective, there are more people living in the state of Texas. Most Ozzies live on the coast, making traveling between cities a bit of a trek. For example, if you wanted to go from Brisbane to Perth, it would either be a 5-hour flight or a 46-hour drive. Traveling within the country is doable as long as you don’t mind long road trips or dropping some cash of flights.
New Zealand is significantly smaller both in size and population. There are only about 4.8 million residents, which is less than the number of people living in Alabama. Because of its size, New Zealand is a bit more accessible, but that shouldn’t leave you to believe that there’s less to do.
Activities & Nature
Activities and nature go hand and hand in these countries. You’re going to have to be an outdoorsy person to really experience all that Australia and New Zealand have to offer.
Australia is dryer with more red dirt, making activities like hiking popular. Travelers often visit the Daintree Rainforest, a UNESCO World Heritage site where people can hike and take tours. People also tend to live near the beach, so water activities are going to be plentiful.
If you’re looking for something indoors, Australia also has a thriving nightlife scene. The Sydney Opera house is one of the most famous tourist attractions, but there’s much more to do beyond that.
New Zealand is a very lush green country that will definitely push you out of your comfort zone. Kayaking, rafting, and diving are just a few prominent adventurous activities.
Something very unique to New Zealand is Hobbiton. You don’t have to be a fan of the Lord of the Rings franchise to be in awe of the remaining pieces from the movie set in “Middle Earth,” aka Matamata.
Wildlife
Kangaroos (or “roos” as they are called) are abundant in Australia. They are to Australia as deer are in the United States. You may also see koalas, quokkas, wombats, and emus.
The most recognized animal in New Zealand is the kiwi, the bird in which term for locals refers to. But they are not as common as you might think. In fact, kiwis are an endangered species. What you probably WILL see are sheep- lots and lots of sheep! It’s said that the sheep population outweighs the human population.
Cost of Living
Australia and New Zealand both fall on the pricier side when it comes to the cost of living. Australia tends to be more expensive but jobs pay higher wages to accommodate.
Each country has its own currency. $1.00m USD is $1.46 AUD and $1.58 NZD, to put it into perspective.
History & Culture
Australia and New Zealand were both invaded by the British government, but originally they were each inhibited by Māori (New Zealand ) and Aboriginals (Australia).
Maori culture in New Zealand is still present. For example, “kiaora” is a common greeting that means “hello” in Māori You will also find Māori names for places.
Aboriginal culture in Australia is less apparent as it’s been largely wiped out through colonization. In the 20th century, Aboriginals could be jailed for speaking their native language, Wiradjuri. It is a sensitive topic in Australia, as extensive damage that has been done. If you’re interested in learning more, there are Aboriginal communities living in Northern Territory and Western Australia.
Food
Both countries eat a lot of fresh fish and fruit, so there is quite a bit of crossover when it comes to cuisine. You will find dishes like prawns, fish n’ chips, and meat pies in both places.
Remember when we said kangaroos are to Australia like deer are to the United States? Do you see where we’re going with this? Yes, people DO eat kangaroo meat, so don’t be surprised if you see it in the grocery store.
You probably won’t find familiar packaged brand products in Australia, but local favorites are TimTams, Violet Crumble, and of course, Vegemite.
In New Zealand, crayfish, sea urchin, and hokey pokey ice cream (honeycomb) are uniquely popular. Jaffas are the candy of choice. If you want to try a something extra special, Hangi is a Maori dish consisting of meat and vegetables cooked in an underground oven.
You are googling high school abroad. You are scrolling through Instagram to see all the inspiring travel photos. You are preparing a powerpoint to easily present this crazy idea to your parents – they may even have said “Yes!!”. You’ve watched all the Youtubers you can and you are ready to go!! What is stopping you? In case you need even more inspiration to take that leap – here is a helpful list of the ways you will be forever changed if you do decide to go on a high school abroad program.
Be part of a select group.
Did you know only about 1,200 students go on a high school abroad program every year? That is for the entire United States! You will be one of the select few students who actually becomes an exchange student in high school.
Develop practical language skills.
There is NO better way to gain fluency in another language. I get asked all the time if it would be better to study abroad in college and don’t get me wrong that is wonderful BUT the problem is you don’t usually get the same level of language and cultural immersion. How you can settle in and learn about the daily life of your host country and how can you have any hope of gaining fluency in the language if you are with international students and speaking English all day.
Have roots on the other side of the world
The host family you stay with will be your family for your whole life! How beautiful is that? You essentially become their son/daughter, you do life with them and that is a bond that lasts. Ask anyone who was an exchange student in high school and they will tell you that even into adulthood, they stay in touch with and visit their Host family. Don’t miss out on this opportunity for a sincere connection with a family abroad. Not to mention your local friends.
Experience being independent
If you study abroad in High school, there is nothing that will intimidate you. If you can leave your comfort zone and spend three months, a semester, or (eek!) a year of high school abroad. You will become SO much more confident, independent, and mature. It’s amazing and you are learning a million things that you could never learn if you stay home.
Prepare for the future
You’ll get much more out of your college years if you study abroad in high school. So many students go to college and have no idea what they want to do. I sure didn’t! Living in another country and seeing another part of the world really helps you understand yourself better and move into your college years with more confidence and clarity.
I hope this list was helpful. If you are still unsure, I’d be happy to talk discuss the options with you or your parents or you can reach out to past and current participants in our Facebook group. Here is my calendar, find a time that works for you and we’ll talk soon!
So you just finished your Teen Summer Language Camp. You’ve embraced life with a host family, sampled your new favorite foods, accelerated your language skills and met other teens from all over the world. But the summer is coming to a close, and you wish you could do it all over again, or at least stay abroad a little longer.
Now, let’s not get confused. Teen Summer Language Camp is NOT just a short version of High School Abroad. The two programs are totally different but go hand in hand.
Here are some of the similarities and differences broken down:
High School Abroad
Teen Summer Language Camp
School
Local high school
Language school
Accommodation
Host family
Host family or residence hall
Length
Summer (1-2 months), trimester, semester, or academic year
2-6 weeks
When
Summer, Fall, Spring
Summer
Both Teen Summer Language Camp and High School abroad offer full language and cultural immersion, but the lengths and experiences are vastly different.
After successfully completing a Teen Summer Language Camp, you’re ready for the new experiences, joys and challenges that come with studying abroad in a local high school for a longer period.
Greenheart Traveler Alexander Obenchain always knew he wanted to study abroad in high school in Japan. In Summer 2018, a Teen Summer Language Camp in Tokyo was the first step to help him prepare for his academic year high school study abroad in 2019. Easing into the language and culture of Japan in Summer 2018 allowed Alexander to hit the ground running when he landed in Japan for his high school program.
“Coming for a smaller amount of time helped me prepare for the difference in atmosphere between here and the states,” he explains. “It was certainly a good thing to have studied the language a little bit more in-depth beforehand. I can also compare my skills from now to then.”
And navigating the Japanese train system? He figured that out a long time ago!
But you don’t have to return to the same country you went to for your Language Camp. Maybe you went to Salamanca, Spain in the summer, and now that you know you can handle being far from home, want to explore Sweden!
So is studying abroad in a local high school right for you? With improved language skills, you’ll be ready to learn subjects like math, science, and drama in another language. After living with a host family for a few weeks, you can anticipate how much you can learn about a country and its culture through observing (and living) day-to-day life abroad. You’ve proven to your parents that you’re independent, capable and problem-solving.
When you’re a parent sending your child abroad, you know there’s a lot they must prepare for: culture shock, homesickness, and language barriers. But your children aren’t the only ones experiencing a life change.
“This was definitely a learning experience for the parents as well!” says Lisa Hall, mother of high school in Sweden alum Matilda. “It was very hard to not be there to help when things were tough.”
So what can you do? Miles away from your children, how can you still support them? We asked parents of Greenheart Travel alumni share their insight on how you can best support your child while they’re abroad. Here are their tips.
Before they go abroad, talk about life when they return
“Prior to him leaving for the 6 months, we did discuss what he wanted to do at his school in the US during his junior year. He decided he would try to run for student council office while he was overseas. And unbeknownst to his dad and I – he did run, campaigned via Instagram and won the vice president spot for the upcoming junior class here in the US. The lesson to learn…. make goals with your child and then let your child be the captain of that ship while he is away.” -Bonnie Green, mother of high school in New Zealand alum Graham.
Agree on a weekly time to talk – and stick with it
Schedule a time and way to communicate in advance, that way you are both on the same page. For example, decide that they need to check-in on Sundays around 7:00 pm their time via WhatsApp. This way, you don’t need to send them texts throughout the day because you’ll already have a set time to catch up.
Mary Scott, mother of language camp in Spain alum Emmy, explains why it’s so important to give space. “While she was abroad, we made sure we weren’t constantly bombarding her with texts and skype calls which at first was difficult. However, we knew she would have a more enriching experience if she wasn’t having to think about us back in Michigan the whole time. We wanted her to be able to completely devote herself to speaking Spanish and learning about her new environment.”
For Hall, being far from her daughter was “hard in a different way when she was having so much fun, there was hardly any contact! But that was the best kind of growth for us all.”
Olivia McCollum at her high school while studying abroad in Japan
Recognize that YOUR life is going to change
Your life at home is undoubtedly going to change. For Bonnie Green, she and her husband experienced being empty nesters for the first time.
Her advice? Take this opportunity and focus on you.
“Make a list of things YOU want to do while your child is away. My husband and I took dance lessons, had adult only (no children) dinner parties, accomplished house updates, traveled to visit our children who were away at college, visited aging parents, put in extra time at work and started hiking more.”
And that leads us to our next point…
Don’t say how much you miss them or how much you want them home
Your child will most likely be homesick at some point, and it can be really hard to go through that while hearing pleads to come home. Being asked to come back and hearing about what they are missing at home can make a hard day so much worse.
Instead, tell them that you are so excited to hear about their adventures when they are back.
Jacob Dane Chilton with host family in Spain
Encourage them to reach out to local staff and take initiative
Part of why going abroad builds confidence and leadership skills is because travelers are expected to speak up and handle themselves. Instead of telling your teen what to do, or doing things on their behalf, allow them the opportunity to be independent. This is especially important when handling the pre-departure logistics so that they don’t feel totally lost when stepping foot in the airport. “When a problem comes up, discuss the different ways it can be solved instead of jumping in and telling them what to do.” says Scott.
The best thing you can do for your teen is to let them practice communicating with adults and learning how to manage themselves. It can be hard to trust your child to do everything right but giving them that space to grow will make them better prepared for their program (and life).
“I think it is vital that while your child is aboard that he/she become a part of their new community,” says Green. “While he did stay in touch with friends in the states, he made friends in NZ. The small town even had a send-off for him and took him to the airport.”
Read about their country and take interest when they share new knowledge
A great way to get involved intheir experience is by learning more about the culture in the country in which they’re going.As you learn about your child’s new home, take note of what your child is excited about. “I was sure to listen to all the positive details, no matter how small!” says Hall.
You could practice making a tortilla españolaor start listening to the music of traditional Austrian brass band and surprise them with your newfound knowledge.
Greenheart staff member Allison Yates’s mom started learning Spanish when she studied abroad in Argentina. “She knew that Spanish was a huge part of my life, so it meant so much that she wanted to learn it too! It helped her feel like she understood my experience more,” says Yates.
Students attending high school abroad in the Netherlands
Educate yourself on what they might be feeling – and how you can help from afar
A great way to get a sense of the mental and emotional experience of studying abroad is by completing the Greenheart Travel Atlas along with your child. This is tool for before, during, and after the cultural exchange experience that includes personal and professional development, cultural understanding and environmental awareness.
For example, if your normally independent child calls you multiple times a day when they first arrive in the country, you’ll remember it’s likely initial culture shock. You can remind them to follow the Greenheart Travel Atlas tools to overcome this stage and focus on meeting new people and spending time with their host family.
Halls says she supported Matilda by “making sure she knew I was there to talk about things, whether they were positive or negative. I tried to give her as much time as I could, but not to have it be open-ended or all the time.”
While your first instinct might be to check in more frequently, increased contact with friends and family back home only exacerbates culture shock.
Rest easy – they’re in good hands
“We had to give up our control and trust in the goodness and professionalism of others. We did our research, chose a great partner in Greenheart, and raised a strong daughter,” says Laura Foster, mother of high school abroad Costa Rica alum, Eleanor.
As parents and former exchange students, Greenheart and our in-country partners know what it’s like to be far from your family, and we work to equip students with the tools they need to succeed.
If you’ve ever gone abroad before you have most likely had to fill out some sort of international documents and paperwork. It’s a drag. Who wants to fill out what seems like form after form when you could be creating a travel itinerary of all of the places you are dreaming of going! However, this paperwork plays an important part in keeping you safe and accounted for while traveling abroad. More often than not, your duration and reason for travel determine how much paperwork and planning you have to do.
This blog will serve as a guide to my experience with obtaining a Student Visa at the Spanish Consulate in Chicago. Currently, I am nearing the end of the process of applying for a Spanish Student Visa. I will be studying at the Universidad de Sevilla in Seville, Spain next year for nine months and couldn’t be more thrilled!
To be honest, I’ve never really minded filling out paperwork, especially when it came to cultural exchange; I knew it meant that I was one step closer to getting off that plane and interacting with locals. However, I’m going to be frank and say that this application was no walk in the park. Because I will be studying in Spain for over 90 days, I needed to apply for a student visa, and because I would be staying over 6 months, there were additional documents I needed to obtain.
Before I could even start on all of this paperwork, I needed to figure out where my closest Spanish Consulate was and make an appointment no sooner than three months before the start of my university classes. Since I live in Michigan, the closest consulate was in Chicago, a place where I luckily know quite a few people (Greenheart Travel 💚). With my appointment date set, I got to work on the long list of things I needed to acquire.
National Visa Application
I got this from off of the consulate’s website and filled it out with some help from my program coordinator. This form needs to be completed in capital letters and with DD/MM/YYYY format. Once it was filled out, I glued one of my passport photos to it and made a copy.
Money Order
For the Chicago Spanish Consulate, the current fee for a student visa was $160. They do not accept cash or check so I went to my post office to get a money order. I paperclipped this to my application form.
Prepaid/ Pre-addressed USPS Priority Express Envelope and Disclaimer Form
This envelope is a bit pricey ($30 ish) but guarantees that your documents will be delivered quickly and safely. I put the consulate’s address on the “From” and my home address on “To.” The disclaimer form is found on the instructions form from the consulate and states that you are allowing the consulate to mail your passport with the visa back to you.
Original Passport and ID
A passport was something I luckily had already so there was no extra paperwork there. Keep in mind that generally, a valid passport is one that will not expire for at least six months after the date you leave the foreign country. I photocopied my passport as well as my university student ID, and my driver’s license. Be sure to bring your actual passport and cards to the appointment as well.
Two Passport Photos
I got these taken at the study abroad office on my university’s campus for $3, but you can get these taken at a lot of places like the post office or Walgreens.
Original Hardcopy Acceptance Letter, Evidence of Funds, and Proof of Health Insurance
Since I am going through a study abroad provider, this was all taken care of and sent to me.
All three of these needed to be in Spanish or have a translation. The acceptance letter was to prove I was enrolled as a full-time student, the evidence of funds was to assure that I would be able to pay for my program, and the proof of health insurance was to cover any medical fees I might obtain during my stay. I made a copy of each of these forms.
Medical Certificate (For stays over 180 days)
On the consulate’s website, this is one of two additional forms to print out for stays over 180 days. I just made a normal appointment for a physical and brought in the paper. This form states that you are in good physical and mental health and do not have pre-existing conditions. There was a little confusion at my appointment as the form had a Spanish translation of what it said in English that needed to be stamped and signed as well. Because there wasn’t a translator in my doctor’s office that day they wouldn’t stamp it (surprising for a town that has a significant Hispanic population), so I had to come back the next week when the translator was in. I made a copy of this form.
FBI Background Check with an Apostille (For stays over 180 days)
This document was definitely the most frustrating and tiring of them all. It began by going through a service called Accurate Biometrics (there are a few to choose from) to get my fingerprints scanned and sent to the FBI to run the background check. This was relatively easy as I made an appointment online then went into a FedEx office for the scan. It cost about $40 and took just about ten minutes. My results were sent to me the next day through my email.
This is when it became difficult. I needed to get an Apostille of the Hague Convention (this is a kind of “stamp” that makes the document internationally recognized) issued by the US Department of State in Washington DC. I hadn’t received any direction on what this was or how to get it so I emailed my program coordinator and went on the government website. Since I had a little over a month until my appointment at the consulate, I decided not to go through an expensive apostille service and just send it to the Office of Authentications myself. In my envelope, I needed to include my FBI background check, an apostille request form (called a DS-4194), a check for $8 (that was the fee for my document), and a pre-paid addressed USPS envelope for them to send me my document back.
I had read that this would take about 10 or 12 days. When it got to be around that point, I called the office to check my document status. After waiting about 20 minutes on hold, they told me that I was not in the system and that it must be in their mail room still being sorted. I knew I should’ve gotten tracking for this envelope… I called back multiple times over the next couple days and got the same response every time. I started to panic a little as my visa appointment quickly approached. With an urge from my study abroad coordinator, I swallowed my pride and contacted an apostille service. Because I didn’t have much time left before my appointment I was forced to get the “rush” service which was about $300 altogether.
With $300 drained from my bank account, but a bit more peace of mind, I waited for my last document to arrive. It came by mail with 3 days before my appointment. Because this also had to be translated into Spanish, I went through the company One Hour Translation. With my FBI background check and the Apostille, it was around $45 and was sent back to me within 50 minutes. After I received these last forms, I compiled everything into an envelope and waited for my appointment.
But you’ll never guess what showed up in the mail the day before my appointment…
My ORIGINAL FBI background check with Apostille. Yes, the one I DIDN’T have to pay $300 for… My only advice is – buy tracking for your envelopes.
The Appointment
On the day of my appointment, I woke up pretty early to catch a train from Michigan City, IN to Chicago. I got to the consulate a bit early; because there wasn’t a sign in sheet, I sat down and waited to be called. Once called up to the window, I handed over all of my documents and passport. The official checked them all and handed back the originals (to be used while in Spain) and kept the copies. All that was left to do was give him my envelope and disclaimer form. This appointment took no more than 5 minutes. He even thanked me for being so organized and following the instructions!
To be honest, this process was probably one of the hardest and most mentally taxing things I’ve ever had to do. However, I know I truly am one step closer to experiencing new changes; changes that will introduce new people, insights, and ideas to my life.
This post is an example of a student’s perspective of applying for a student visa. This is not a step-by-step guide for applying for student visas. Each country (and each consulate) has different requirements. While Greenheart cannot apply for your visa for you, we provide detailed application instructions and support during the application process.
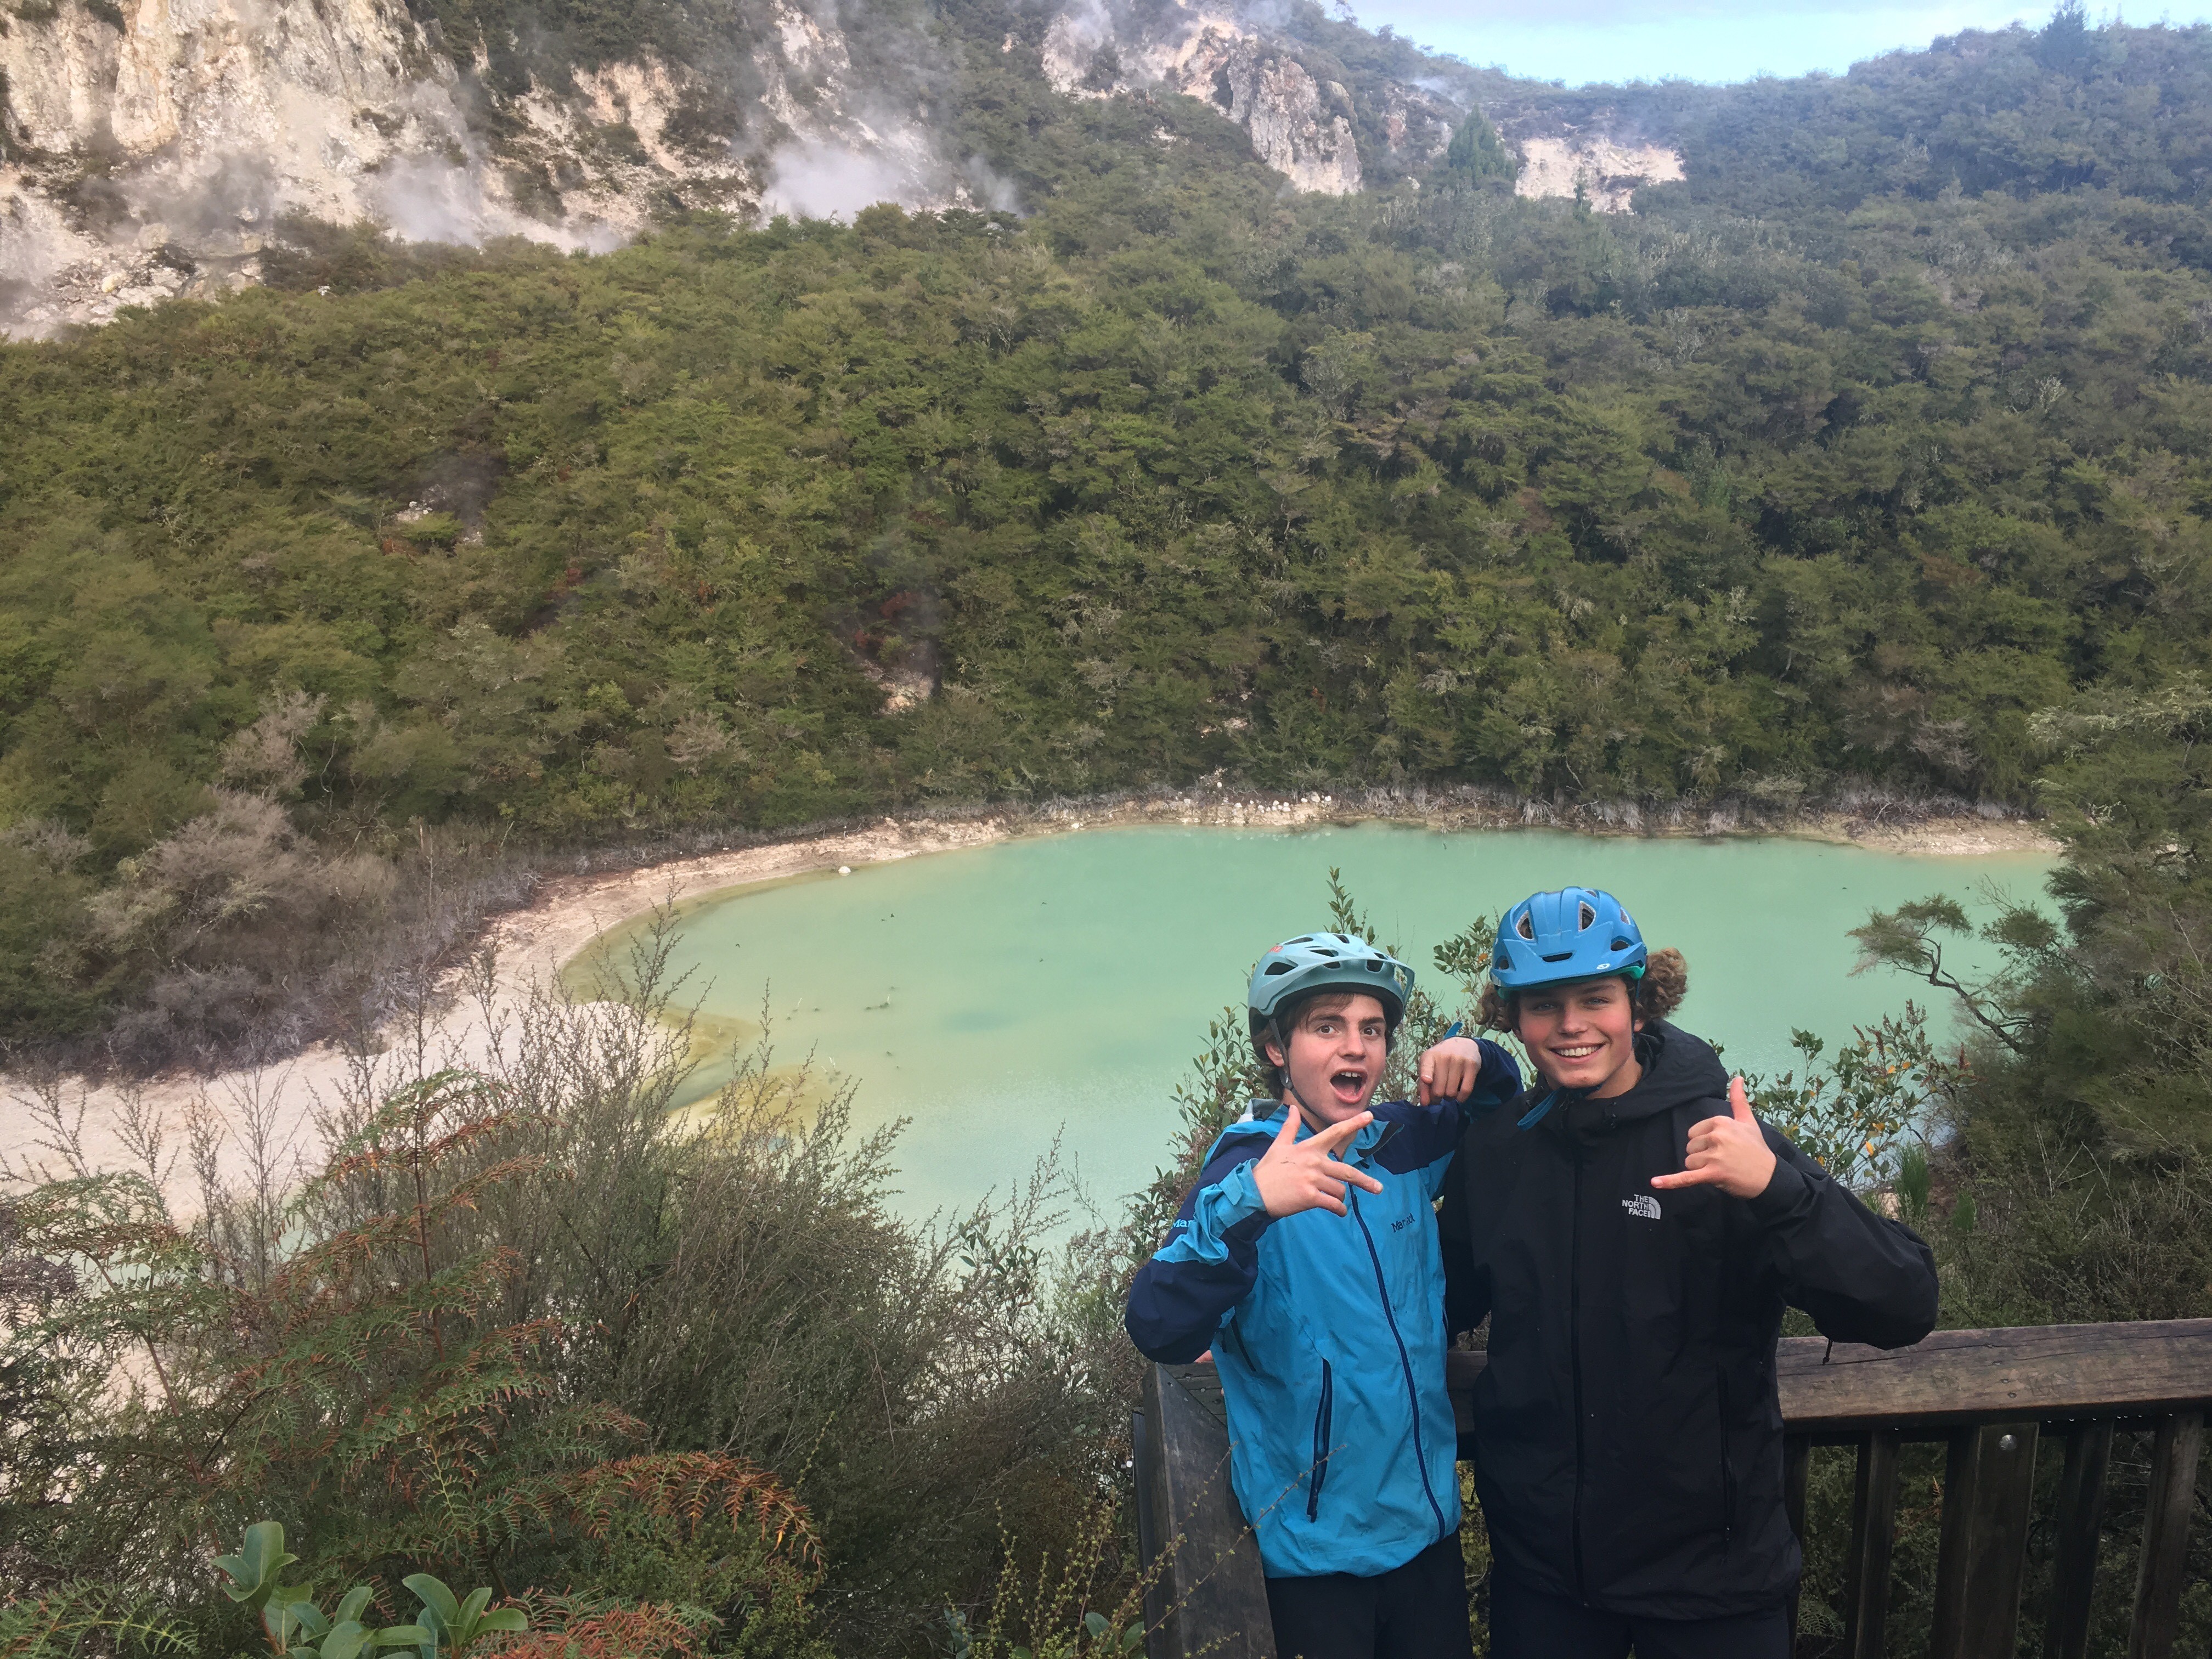
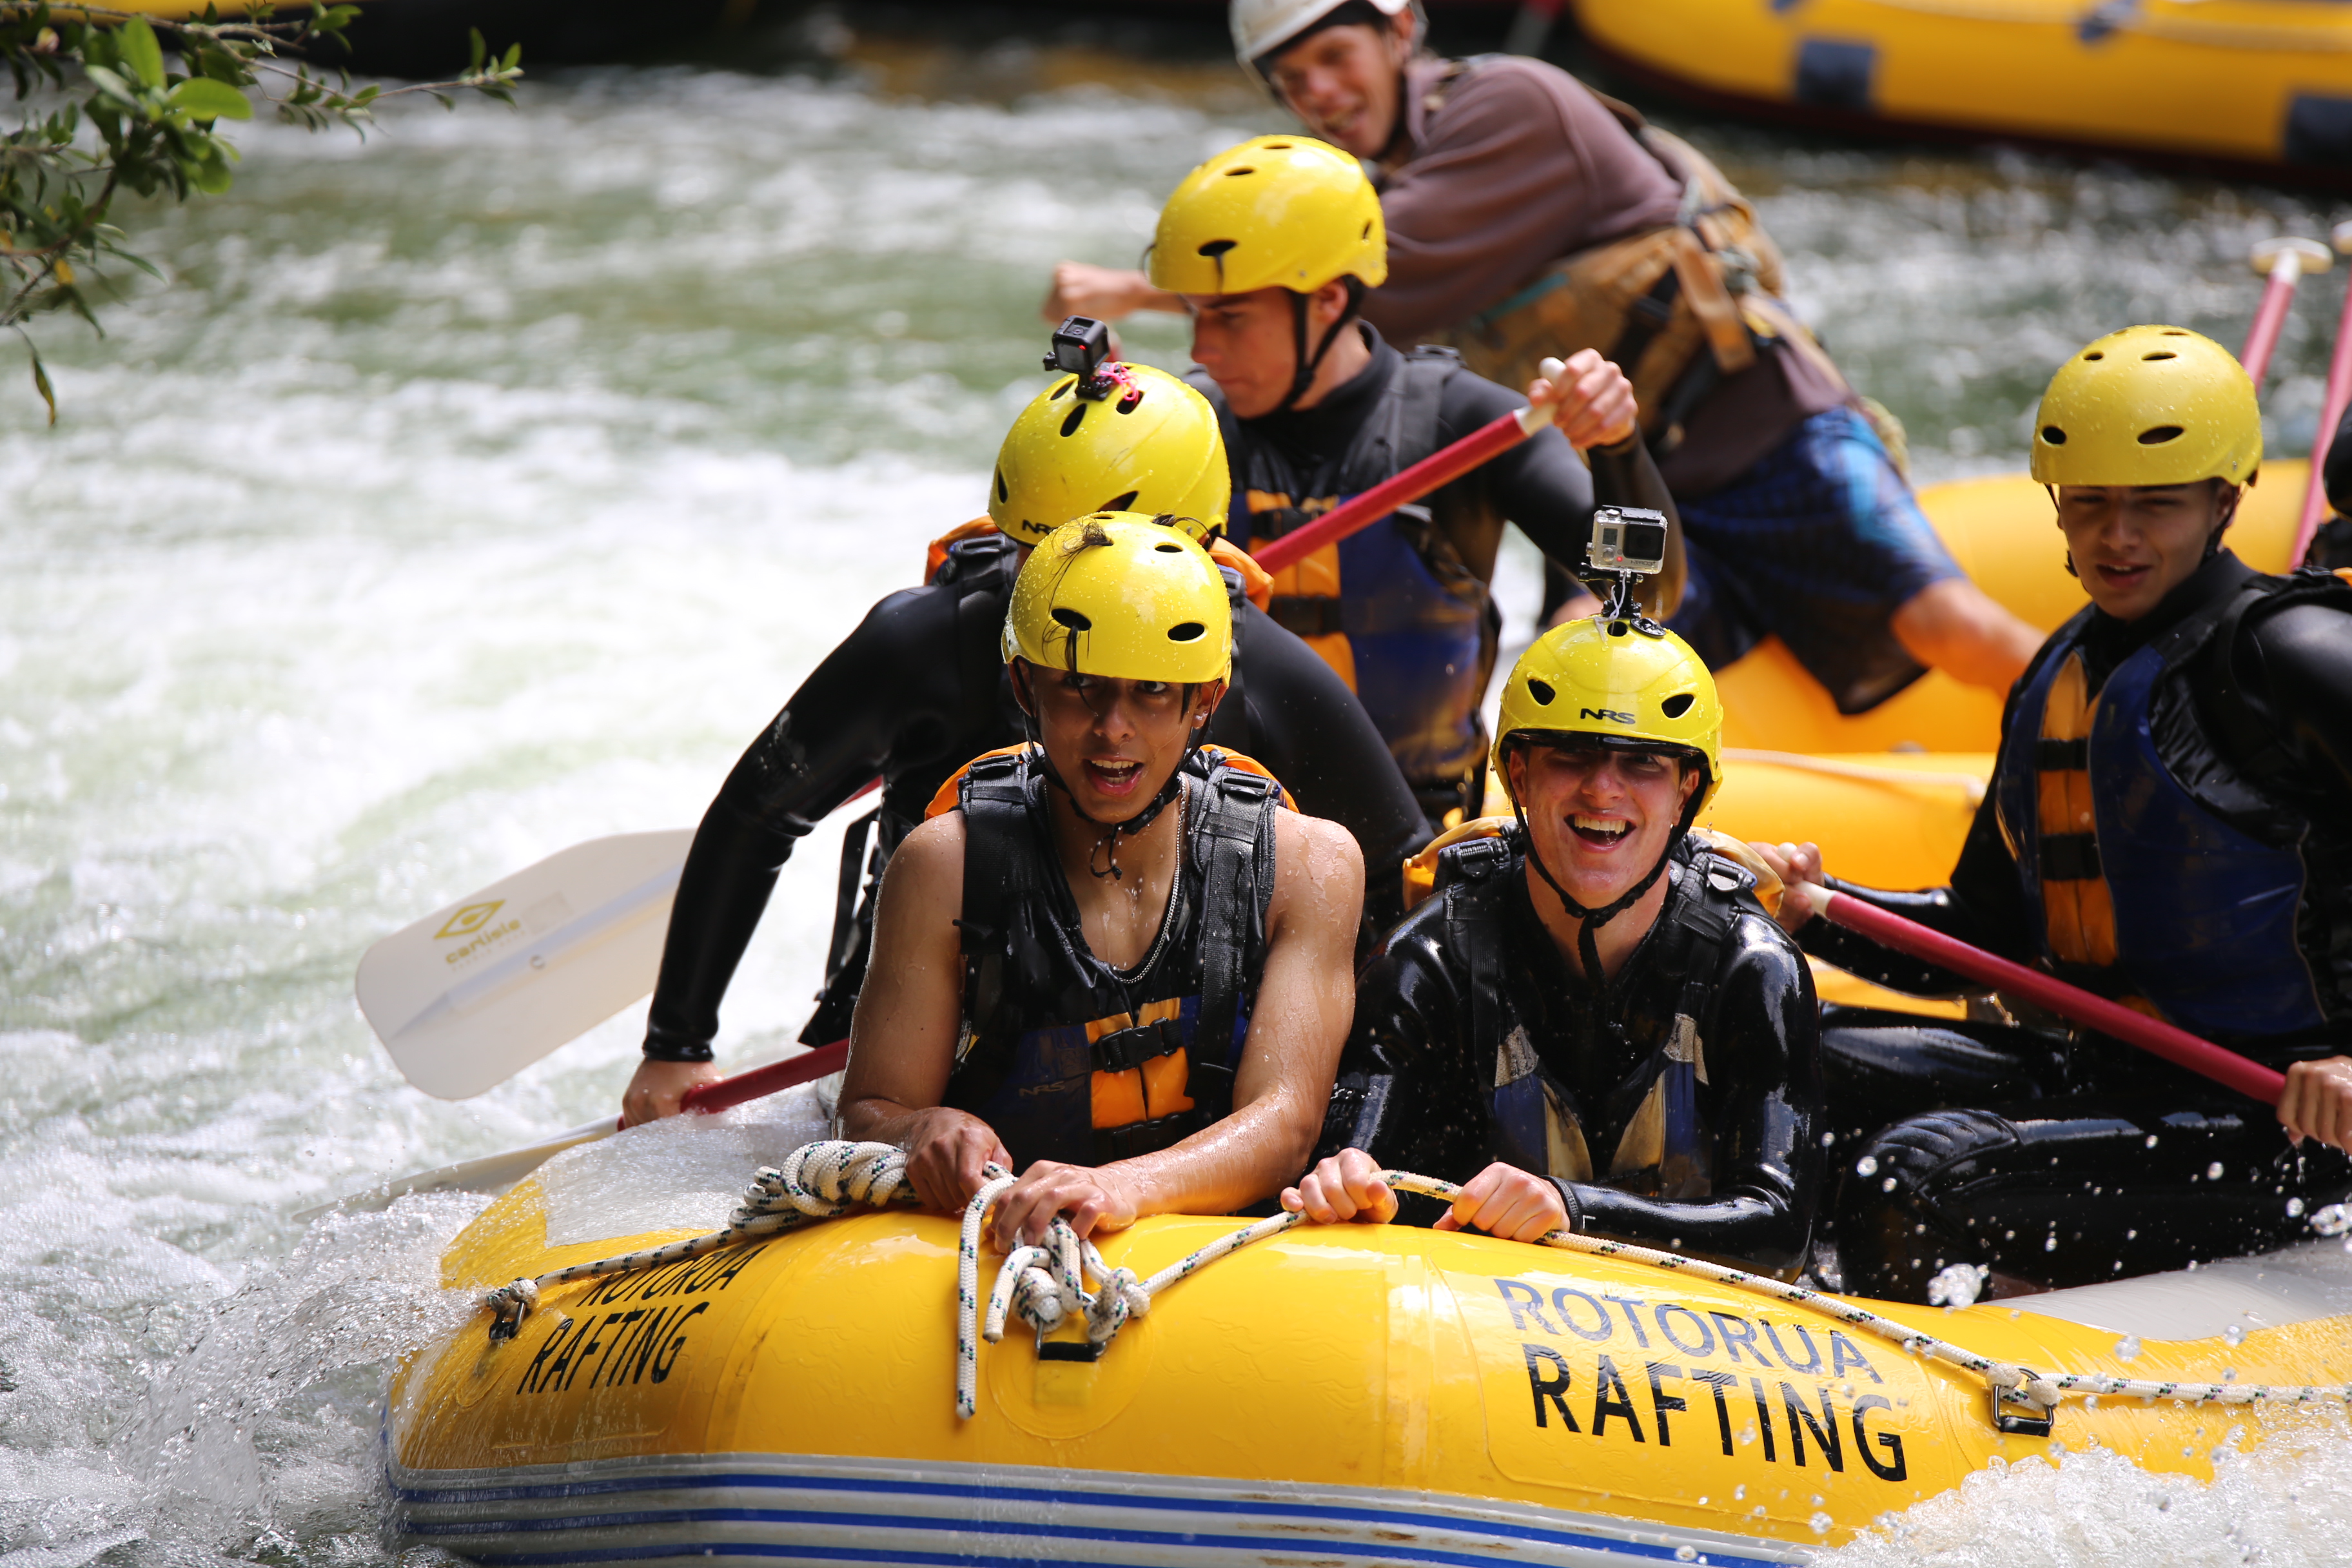
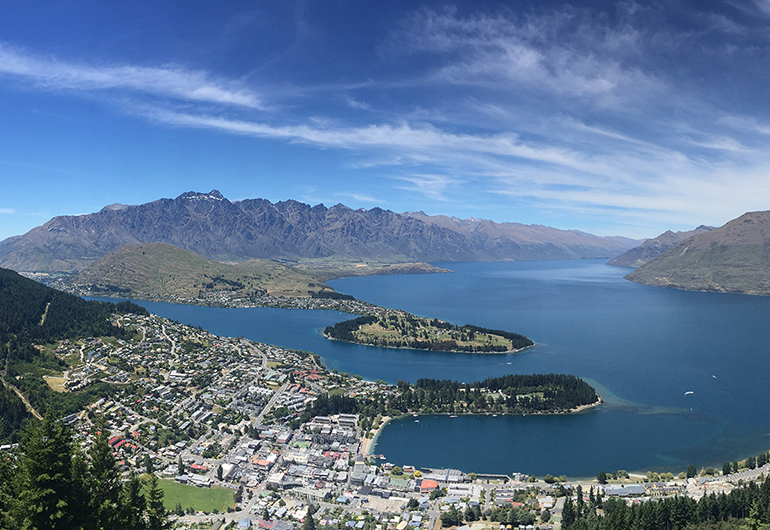
I have been in New Zealand for quite a bit of time and while I was not mountain biking through the redwood forest, tramping (hiking) in native bush, and kayaking deep in volcanic river canyons, I went to school. The transition was not extremely difficult but there are definitely a few aspects that confused me at first. Here is a wee article on the New Zealand school system written by an American international student to other international students who are about to embark on a journey of a lifetime.
Firstly, since New Zealand is located in the Southern Hemisphere, it is important to realize that the school year, just like the weather, is switched. Instead of running from around August to June/May school runs from January to November/December (depending on your year level and the exams you choose to take). It can get chilly during the year, but it is important to wear your school uniform as many schools are quite strict about this. But do not worry, they will have jackets and pants as a part of the uniform. Lastly, New Zealand schools are proud of their culture and emphasize the Maōri word whanau (family) throughout the school. From the beginning of the year, you will be placed into a specific house with a portion of the school’s students and teacher. Many of these people will become close friends.
A normal school day goes as the following:
8:40, Arrive at school before
8:40 – 8:55, Roll check/homeroom
8:55 – 9:55, Period 1
9:55 – 10:55, Period 2
10:55 – 11:20, Interval (break)
11:20 – 12:20, Period 3
12:20 – 1:20, Period 4
1:20 – 2:10, Lunch
2:10 – 3:10 Period 5
However, on days where it is stormy outside the school often shortens lunch by ten minutes allowing students to get out at 3 pm.
Schools often have a few sports days (one fun day and two competitive days of track and field/swimming) throughout the year in which students have the day off in order to participate. The teachers, unlike most adults, are referred to as their last name (e.g. Mr. Dunn). Teachers are often formal when needing to be formal, but will still share a laugh with there students. Classes are relaxed and less strict compared to the US. For our interval and lunch break, many students flock to the school Cantine for a classic New Zealand pie or hot chips/wedges while others, like myself, bring their own lunch. Most students will eat outside throughout the school at benches or tables with their friends. There will often be an international room open as well for international students to meet for announcements and such.
As far as classes go, you will be placed in a class with a number similar to the US but there can be lots of exceptions. For example, when I arrived in New Zealand I was a fifteen-year-old coming from my second semester of sophomore year, but on my first day of school in NZ, I was placed in Year 12. This is common due to the switched school years. As a student traveling to New Zealand at the start of the New Zealand school year, you will probably be placed in a year above what you currently are aged. Heres a handy chart to help with high school years, but remember, there can be lots of irregularities.
New Zealand Years
Age Group
USA Grades
Year 9
13 – 14
8th Grade
Year 10
14 – 15
Freshman Year
Year 11
15 – 16
Sophomore Year
Year 12
16 – 17
Junior Year
Year 13
17 – 18
Senior Year
The grading in New Zealand is completely different from that of the US and follows the National Certificate of Educational Achievement (NCEA) system. Students do internals (class projects and tests) and can do externals (exams) in order to earn a certain amount of “credits” for each class. Each of these externals or internals have a set amount of credits that can be awarded if the external/internal is passed. These credits can take many forms of achievement from ‘not achieved’ (F) to ‘achieved with excellence’ (A). At the end of the year, a student is required to have a certain amount of credits in a class to pass the class. One can pass a class with only achieved credits just like you can still pass a class with a C in the USA; however, students often pursue excellence credits as this will be noticed by universities and scholarships.
This chart shows how the grading system transfers.
New Zealand Grading
USA Grading
Not achieved
F
Achieved
D/C
Achieved with Merit
B
Achieved with Excellence
A
So that is basically everything you need to know! The rest will be a fun surprise. If you are reading this, I definitely encourage you to take a leap and a risk and go to New Zealand as an international student. You will not be disappointed!
When deciding whether or not to study abroad as a high school student your mind is likely full of questions like “Will I make friends!?” or “What if I’m lonely?” While we are here to can support you as much as possible through things like the Greenheart Travel Atlas, nothing can beat hearing first-hand from two Greenheart high school study abroad students about their experience.
But the truth is, high school study abroad isn’t only about emotional and personal growth. It also positively impacts your college applications, including how you explain why you’re choosing your major, applying for specialized scholarships, and proving you’re the right candidate for the school.
Snorkeling in Ningaloo Marine Park, Australia.
I know what you’re thinking: but what about the gaps on my transcript, or if I don’t get credit for the classes I take abroad?! (pro-tip: read this blog post if you’re worried about transferring credits!) Well I’ve got news for you! It’s okay. And those gaps are easily explained in essays and open-ended questions on the application.
Here are the top 4 ways studying abroad in high school positively impacts your college application.
1. You’ll Make Your College Application Stand Out
When I spoke to Kyle, an admissions officer at the University of Chicago, he said, “Anything that makes your application stand out is a good thing.”
Student surfing the Australian coast.
Study abroad in high school takes guts – and that’s a good thing. We’re not afraid to tell you it’s going to be hard sometimes, especially when it comes to facing language barriers, making new friends, and navigating a whole new culture and host family. But what do struggles mean? Growth.
When life gets hard and we learn to solve problems and overcome challenges, we reap the benefits across the board, but we also have a great story to tell – a story that is sure to help you write a heartfelt, powerful admissions essay.
Student on a bridge in Malmo, Sweden.
Plus, your high school study abroad shows you have the maturity, independence and adaptability to hit the ground running when you get to college, and there’s nothing that pleases an admissions officer more than feeling confident you’ll make their school shine.
“A lot of schools are looking for a diverse perspective, and international experiences lend themselves to that,” Kyle said.
2. Scholarship Applications and Interviews Will be A Breeze
After studying abroad, you’ll have some specialized and specific knowledge – and probably language skills – that will allow you to find specific scholarships for what you’re looking to study.
Two students in Salzburg, Austria.
For example, Sierra Winters, a current full-ride Robertson Scholar at Duke University, found her passion for food systems and refugees while studying abroad with Greenheart Travel in Austria, and came back to the U.S. to fundraise for the Syrian Refugee Crisis efforts. “It was a challenging experience, and it was one that I was passionate about, and it lent me the genuineness for which colleges and scholarship programs are looking,” she says.
Plus, after you’ve spent a semester studying abroad in a high school where you don’t know the language and have had to make presentations in front of tons of students…. Speaking about your experience to an interviewer will be a breeze!
Student with homestay parents in Spain.
3. You’ll Know What You Want to Study
Studying abroad in high school opens you to a world of possibilities that you’ve probably never thought of. Seeing what’s out there will help you hone in your skills and passions before you start college. The average college student changes their major several times before graduation and, while we love exploration, it’s better for your pocket and time to already have a clear sense of what you want to study.
Students in the mountains in Argentina.
Greenheart Travel High School Abroad in Argentina alum Erin Clark went to Argentina in 2013 thinking she wanted to study business. Once she got to Argentina, she realized she was far more interested in the travel industry. She decided she wanted to study hospitality and tourism, and “that changed what universities I was looking at, and that’s how I found Niagara University,” she explains.
Imagine how different her life would be now if she hadn’t studied abroad!
4. You’ll Have the Confidence to Say Yes to New Opportunities
You might have already heard the phrase “travel bug.” It means that once you get a taste, you want to eat the whole cake! All of us at Greenheart Travel have the travel bug, and we see that as a good thing.
Latern festival on a street in Japan.
Once you see the life-changing experience of studying abroad in high school, you’ll be inspired to seek out more new and different experiences, like volunteer trips, internships, discovering new places and meeting new people.
Climbing the waterfalls in New Zealand.
“[Study Abroad] put my foot in the door for any job I want – I’m always the first to apply for jobs and I’m very driven, and I go out and get things done,” says Clark.
That’s an attitude that will positively affect every aspect of your life!
For a lot of people, a big part of cultural immersion programs means practicing a new language. Language barriers can be great learning experiences, but they can also be very intimidating.
I’m an English-speaking American, and for many reasons, learning another language was not a priority when choosing my study abroad destination in college. I ended up going to England and visiting places such as Bath, London, Oxford, Cornwall, Glastonbury, Salisbury, and more! Before arriving, I had anticipated a lot of similarities between England and the United States. After all, they are both English-speaking countries, how much of a “cultural immersion” was I going to get?
I’m embarrassed to admit this, but I really didn’t know what to expect. That’s why I’m going to share with you a list of eight things I learned while abroad – none of which were a new language.
Prior Park Landscape Garden in Bath
1. Pace
People move a little slower. That’s not to say there is no hustle-bustle (hello, London) but there is this overall mentality to take time to enjoy life.
2. History
My public school education basically taught me what Hamiton accomplished in two hours. I’m totally kidding, but my history knowledge was limited to that of the United States. England has been around way longer, which means they have even more history that I barely knew.
Here I am posing outside of the Bath Abbey
3. Food
Not only did I not know what a pasty was, I pronounced it wrong for weeks. I was also suspicious of something called ‘black pudding’ which turned out to be one of my favorites. I realized that everything I knew about food was constructed from American culture. Turns out, beans are great for breakfast!
The UK also has different nutrition regulations, so some of the brands you know and love taste a little different.
4. Slang
Having watched every episode of Skins in high school I thought I was prepared with all the lingo, but I barely scratched the surface. Did ‘cheers’ mean thank you? Goodbye? Congratulations? I had to ask the meaning of a handful of words that I thought I already knew.
5. Media
You might be thinking, “Hey, why is every channel BBC?” or “Is that nudity on a kids’ show?” Although a large amount of content is made in Hollywood, England has its own programming and rules to go along with it.
This bust of The BBC’s John Reith doesn’t match my enthusiasm
6. Humor
I didn’t quite get what people meant by ‘British Humor’ until I arrived. I still don’t know how to describe it except to say it’s subtle and ironic. Take note of the differences in the British version of The Office and the remake of the series.
7. Travel
An hour flight in Southern California will get you to Northern California. An hour flight in Bath will get you to Ireland, and lots of other places.
Just popping over to Dubin, BRB
8. Fashion
My Midwestern upbringing taught me that jeans and sweaters are a LOOK. On the other hand, England is a few steps ahead. Sure, a lot of people follow my Jean and Sweater™ vibe, but I saw more than the usual amount of fashion risk-takers while in the UK. The style was bold and very put-together.
Some of the things on this list are obvious, but the point is that I didn’t think these things would impact my overall experience as significantly as it did. There is plenty to learn about a different country’s culture; the language is only a part of it.
Cheers!
Interested in going abroad to an English-speaking destination, like the UK? Click the link below to find out more information!
One of my favorite things about New Zealand when I was working abroad, besides the nature, the beer, the people, the waterfalls, and well pretty much everything, was all of the access to what I call “free culture and nature.” All of the national parks, managed through New Zealand’s Department of Conservation, have zero fees for admittance. Compared to some of the national parks in the United States, such as Yosemite, with daily admission fees usually $20 or more, I found the “freeness” of nature in New Zealand to be especially refreshing.
Even more unique, again especially compared to the United States, is the free access to art and history museums across New Zealand. Let me make this clear for you, in case it has not set in yet. National parks, art galleries, museums and I almost forgot my favorite, the botanical gardens, are all FREE in New Zealand. (No, not only on Tuesdays if you have kids under the age of 10, or only on the third Wednesday of the month, or even only if you buy the price of one full regular admission do you get all of these cultural, art, and nature opportunities for free.)
These parks and museums are free ALL OF THE TIME.
If you are looking to explore New Zealand on a budget, here are my top 5 favorite FREE cultural experiences on the South Island of New Zealand.
#1. Canterbury Museum and Christchurch Art Gallery: Canterbury Region
One of the biggest museums I came across in the South Island was the Canterbury Museum in the heart of downtown Christchurch. The museum has four floors, with two of those being the galleries, one of administrative and museum offices, and the café on the fourth floor.
The range of exhibits in the museum vary greatly and you could easily spend an entire day exploring and learning in all of their different exhibits. When I went, there were exhibits on: the water cycle, Antarctic expeditions, Fred and Myrtle’s Paua Shell House, Japanese motifs portrayed through tattoos, nineteenth Century Christchurch, and an Egyptian mummy.
Paua-Shell house exhibit.
While museums as a whole are not usually my thing, the mix of the exhibits here, plus their admission price, made it well worth my time and exploration. The museum is a great way to spend the day learning about local New Zealand culture and anything else they happen to be teaching that day.
Inside Christchurch Art Gallery.
Just down the street from the Canterbury Museum is the Christchurch Art Gallery. This two story building has several different ongoing and rotating exhibits and a number of different free events going on each month. Their current focus on local artists was especially interesting to me. Additionally the gallery has free Wi-Fi, a lovely store, and a game area where cards and other board games are available if you are just looking for a free and safe place to hang out with your friends or kids for a while.
#2. Arrowtown and Queenstown trail system: Otago Region
Arrowntown trail through an abandoned Chinese gold mining settlement.
While most people go to Queenstown for the party atmosphere and the awesome skiing, I was fascinated by the area’s extensive walking and tramping trails. Forty-Three trails in all are listed on the Department of Conservation’s Wakatipu Walks brochure, covering both Queenstown and Arrowtown.
The walks here vary from 15 minutes to a full day and cover the entire area. While staying in the area, I walked daily from Frankton into Queenstown along Lake Wakatipu, enjoying great views of the lake, local houses, and several small waterfalls along the way. Longer trails can take you up into the mountains surrounding Queenstown, such as the Ben Lomond trails.
The view from the Frankton Walkway into Queenstown.
If you are in Arrowtown, the Millennium Walkway guides you along the Arrow River, connecting to the Gibbston River Trail, crossing the historic Kawarau Bridge, and leading all the way back into Frankton and Queenstown if you walk or bike long enough. The endlessness of these trails and the great signage along the way make it a great way to enjoy the scenery for minimal to no cost.
#3. I-Sites: All Across New Zealand
Signs outside of one of the many visitor centers in New Zealand.
In most towns across New Zealand, both North and South Islands, there are the New Zealand version of Visitor Information Centers, called I-Sites. There are over 80 sites across the county and they were always my first place to go when I visited a new town.
The most useful thing to me was the free maps, but like any tourist office, they also have tons of brochures about local attractions, events, restaurants, shopping, and accommodation in the area. They also have staff available to help you with any questions or directions and can even assist in booking local attractions, sometimes at a discounted rate compared to booking directly with the company.
The sites usually have free Wi-Fi and as they are almost always in the center of town, I have frequently seen them utilized as the main bus stop in town for local transit, and also for some of New Zealand’s cross country bus systems such as Naked Bus and Intercity. As I was traveling during the winter, I would sometimes stop by just to warm up for a few minutes and explore local information that I might not have been able to find elsewhere.
The I-Sites are certainly not the most exciting place to go in New Zealand, but they are great at connecting you to the places that are, and in case you haven’t picked up on the theme yet, their maps, brochures, and booking services are all free.
#4. Invercargill’s Queens Park: Southland Region
The Southland Museum has a successful breeding program for the Tuatara with their most famous Tuatara being Henry who is 110 years old.
While I will openly admit that Invercargill is not the most exciting city in New Zealand, it does have a few cool things going for it and Queens Park would probably be number one. I had seen it on the list top attractions for Invercargill and that was about as much as I knew about it going in. This led me to find a number of surprises as I ventured through their little over 200 acres of land.
First, I visited the I-Site (see entry above as to why) and continued on through the local and always free museum, Southland Museum and Art Gallery. Like most other museums I had come across in New Zealand, there was an interesting montage of exhibits from Antarctic Exploration, Maori culture, Geology, Southland’s role during WWI, and the live Tuatara, an ancient reptile like creature, now extinct across the rest of the world.
View of the Japanese garden.
I then ventured out into the actual park starting in the Rose Garden and into the other specific gardens of this massive park including a Japanese Garden, NZ Native Garden, Winter Gardens, and the Sub-Antarctic Islands Garden.
Unexpectedly to me at least, the Tuatara is not the only animal living in the Park. There is an entire aviary and animal reserve including guinea pigs, wallabies, alpaca, and an ostrich. While the ostrich and wallaby may not seem out of place in an American or Australian zoo, I certainly did not expect to come across them in the middle of a park in Invercargill.
Wallaby siting during my visit.
My last but not least favorite attraction of Queens Park was the bathrooms. Yes I am well aware of how weird that sounds, but seriously these things were pretty cool. Officially called Exeloos, these trumped up porta potties are by far the fanciest public restroom I had ever seen. They come equipped with automatic doors which open at the touch of a button, automatic toilet paper dispensers, and a toilet that does not flush until after you wash your hands.
One of the exeloos in the park area.
Upon entering, you are informed by an announcer of sorts that you have 10 minutes to go about your business which is then followed by some mood music for the rest of your visit. There are three Exeloos across the park, and while I would not visit the park solely for this feature, it is well worth checking out when you come across one.
#5. Every Department Of Conservation Park and Map, Ever: All Across New Zealand
Arthurs Pass National Park.
Undeniably, one of the best things about New Zealand is the nature. Not being a particularly old country and learning from the lessons of the rest of the world, New Zealand in my opinion has done a fantastic job of preserving and protecting their natural environment.
There are Department of Conservation managed parks all across the North and South Islands, so no matter where you end up in New Zealand, you are guaranteed to be near DOC managed land. The special thing about DOC managed land versus just any other park is the guidance that comes along with it.
DOC sign in Ross Gold Town West Coast.
While DOC maps are available for purchase in their local offices, you can download them all for free from their website. Keeping them on either my phone or iPad, these maps were tremendously helpful in my hiking expeditions. The maps, brochures, and DOC website tells you exactly where trails start, which can sometimes be tricky to find in the NZ wilderness. You can also learn how long a trail is expected to take, the level of difficulty, and what you are likely to see along the way.
Orange or white arrows along the trails keep you on the right path, again extremely helpful in the remote NZ wildness and especially useful to me as I often hiked alone and on trails not being utilized by anyone else at the time. Some of the best natural wonders of New Zealand, such as Milford Sound, Franz Josef and Fox Glaciers, Arthur’s Pass and the Great Walks, are all on DOC land.
Walking path maintained by the Department of Conservation in New Zealand.
Make sure to take advantage of the resources offered by DOC to plan and enjoy your journey, without getting lost or ending up on a 6-hour, steep-graded trail when you were only looking for a one hour stroll through a preferably level forest.
Did I miss any free sites in New Zealand to add to this list? Share your added tips in the comments below!